How do you put the fence up and take it down after it is installed?
Simple. To take your fence down, unhook the eye & hook systems to release the tension
in the fence. Then pole by pole, remove each from the plastic ground sleeve. The
plastic ground sleeve protects your feet while the fence is down and preserves the
hole for putting the fence back up.
To put your pool fence back up, put each pole
in its plastic ground sleeve covered hole one at a time. Then re-hook the eye &
hook systems and your done. Your fence is back up and protecting your loved ones.
+See More
Is it easy to install?
Very. The main part of the installation is drilling your holes and we have made
this as simple as possible using two tools unique to lifefence.com: the drill alignment
tool and the cardboard template. The cardboard template gives you the exact distance
between two poles and two sections of fence. Mark the holes using the template and
now you're ready for drilling. The drill alignment tool holds your drill at the
angles you need. A quick adjustment and you can go between drilling straight up
and down and drilling at a 5-degree angle. This cuts your error rate and time drilling
per hole. We estimate you will spend about 1 minute per hole.
+See More
How long does it last?
A lifetime. Our fences all come with a lifetime warranty so you can be sure it will
be standing strong for many summers to come.
Can I fill holes in my concrete if I make a mistake?
Yes, we suggest using non-shrinking epoxy concrete. This will give you the best
results without divoting after drying. If regular concrete is used, divots may form
where you filled your hole.
My shipping seems high, is this shipping price accurate?
We strive to get your fence to you in a safe, timely, and convenient manner. The
fence is shipped via UPS to provide you with full tracking capabilities as well
as residential delivery. Because of the weight of fence when rolled for shipping,
your fence will most likely be divided into a couple of medium weight packages.
If a
gate is ordered, you may notice a jump in the shipping cost. The gate must
be shipped by itself and is considered an Oversized package. Overall, you will find
our fence prices combined with shipping costs still save you a lot of money from
having it installed, as well as give you the highest quality fence available.
+See More
How long is the alignment tool rental for, how does it get to me and back, and what
should I know about renting tools?
Our alignment tool rental, as well as the drill and drill bit rental, is for one
weekend. You may receive your tools any day during the week but since most people
are doing the installation on the weekend we give you through the following weekend.
All of our tools are shipped with pre-paid return labels for returning the rental
tools
to our location. You can bring the tools to a UPS store or give them to a
driver along their route. If you call for a pickup UPS may charge you a convenience
fee. We are not hardliners on the rental periods however, this is not how we want
to make money; we make money by you being a happy customer that got their project
done easily and cost efficiently and then tell all your guests just how easy it
was. If it rains or if something comes up, let us know, in most cases we make exceptions
and can give you an additional weekend at no cost.
+See More
What is the difference between getting a self-closing, self-latching gate and using
the joining of two sections as an entrance?
The self-closing, self-latching gate adds safety and convenience. Safety because
you don't need to remember to close the section behind you. Convenience because
it is as simple as opening a door to get into your pool area.
Can your fence be placed in a wood deck?
Yes if you make some modifications. You would want to go beneath the deck and add
a board in the line of where the fence will be placed. Most of the time, if you
use a 2x6 and deck
screws that are 3" you can screw upward into the bottom of the
deck without going all the way through. What this does is give you at least 4" of
depth for the base of your poles to sit in. Then on each end of the fence (most
fences on decks are blocking an area and not making a full circle) you need to attach
the ends of the fence to a fixed structure, like a railing. This will help to create
tension and keep your pool area secure. You will need an extra hook and eye for
this.
+See More
User Agreement
LifeFence.com guarantees satisfaction and we will refund the purchase price of any
in- stock item that the buyer is not 100% satisfied with. We will accept returns
within 30 days from the date of purchase. All
returned items are subject to a 15%
restocking charge. Buyer must return the item in the same condition that we shipped
it in, with return shipping pre-paid. Custom made or special ordered items may not
be returned.
+See More
Here are the full details on User Agreement
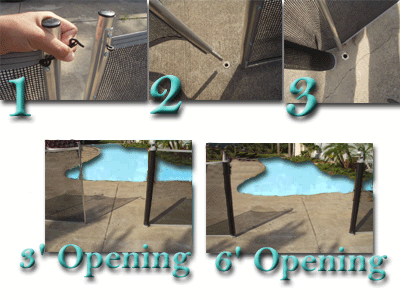
How do I make an opening if I don't purchase a self-closing self-latching gate?
It's as easy as 1,2,3. Plan your fence to have two sections of fencing meet at the
point you want to have an opening. Then drill an extra hole next to the second to
last pole on one or both of the converging sections, depending if you want the opening
3 or 6 feet.
To open your gate, follow the pictures below.
- 1. Unhook the eyehook system.
- 2. Take the pole out of its hole.
- 3. Roll up the fence and place it in the second hole drilled earlier.
Repeat this for the opposite section for a 6-foot opening.
How do you install a fence on steps?
Click Image to Enlarge
When measuring, measure the length of each step and add 2 inches to it. If there
is some overhang from the previous step, stand a broom stick straight up to see
where your pole will go on the inside part of the step, and measure from the inside
of the broom stick to the outer edge.
+See More
You will have to cut the fencing to an inch past the length of your step on each
side. Always use a straight edge when cutting and measure at both the top and bottom.
Fold the last inch over and sandwich that piece between the pole and the outer curved
panel that screws into the pole. Next drill one hole at the beginning of the step
and end of the step. There should be two poles butting up next to one another, the
one at the beginning of the lower step and end of the upper step. Connect these
two poles to have one continuous fence. You will have to purchase extra poles to
create the smaller sections.
How does your fence compare to others on the market?
There aren't many other brands that are comparable to ours. The fact that ours is
a do-it-yourself system saves you a lot of time and money from finding an installer
but it also forced us to make an engineering change from everyone else's pool fence,
stainless steel rods, and this makes
all the difference in the world. The stainless
steel rods go about 6" up the pole, giving maximum support at the base of the pole
where the most amount of pressure will be exerted on the pole, giving our poles
strength above most others. Also the stainless steel rod allows smaller holes to
be drilled using a hammer drill rather than a core drill, which is difficult to
find for rent and very expensive. The third benefit of the rod is it can be bent
slightly but would take extreme force to break. What you find with all aluminum
poles is the pressure and bending causes them to snap at the base (where the pole
protrudes from the cement) after a few years. This is similar to if you move a paper
clip back and forth enough at the same location. Steel does not have the same result.
The mesh can withstand the pressure of a grown adult leaning against it, is mildew
and UV resistant, and is lined on all four sides.
+See More
So to simply answer your there is no comparison to a LifeFence.com fence.
When do I need the extra parts?
Hook and eyes are needed every time you split a fence section into two sections.
For example, if you are creating steps, you will need 2 hook and eyes for each step.
You also need an extra hook and eye if you are not making a full circle around your
pool. You will need one extra to
attach to an adjacent wall or fence. The hook and
eyes can go straight into wood, for cinder block, brick or stucco you will need
to purchase screw anchors at a hardware store. Poles are needed any time you are
going to split a section. If you are splitting the section where there is a pole
already then only one extra is needed. If you are splitting a section where there
is no pole two extra poles will be needed. Dirt spikes are intended for one or two
poles in planter areas, you will need one for each pole. If you want to place your
entire fence in a grass area we suggest pouring sufficient concrete footers, letting
them dry, and then drill your post hole in the footer. Trying to set the pole in
a wet foot will most likely result in a fence that is not plum. Footer size would
depend on the soil in your area.
+See More